We’ve got you covered with some awesome vinyl decal application instructions! Applying decals can be a fun and creative way to add a personal touch to your belongings. Whether it’s a decal for your car, laptop, or water bottle, these step-by-step instructions will make the process easy and hassle-free. So get ready to turn heads with your custom vinyl decals!
Step 1: Gather Your Materials
 Before you begin, make sure you have all the necessary materials. You will need a vinyl decal, a clean surface to apply it on, a squeegee or credit card, masking tape, and a pair of scissors. Having everything ready beforehand will help streamline the process.
Step 2: Prepare the Surface
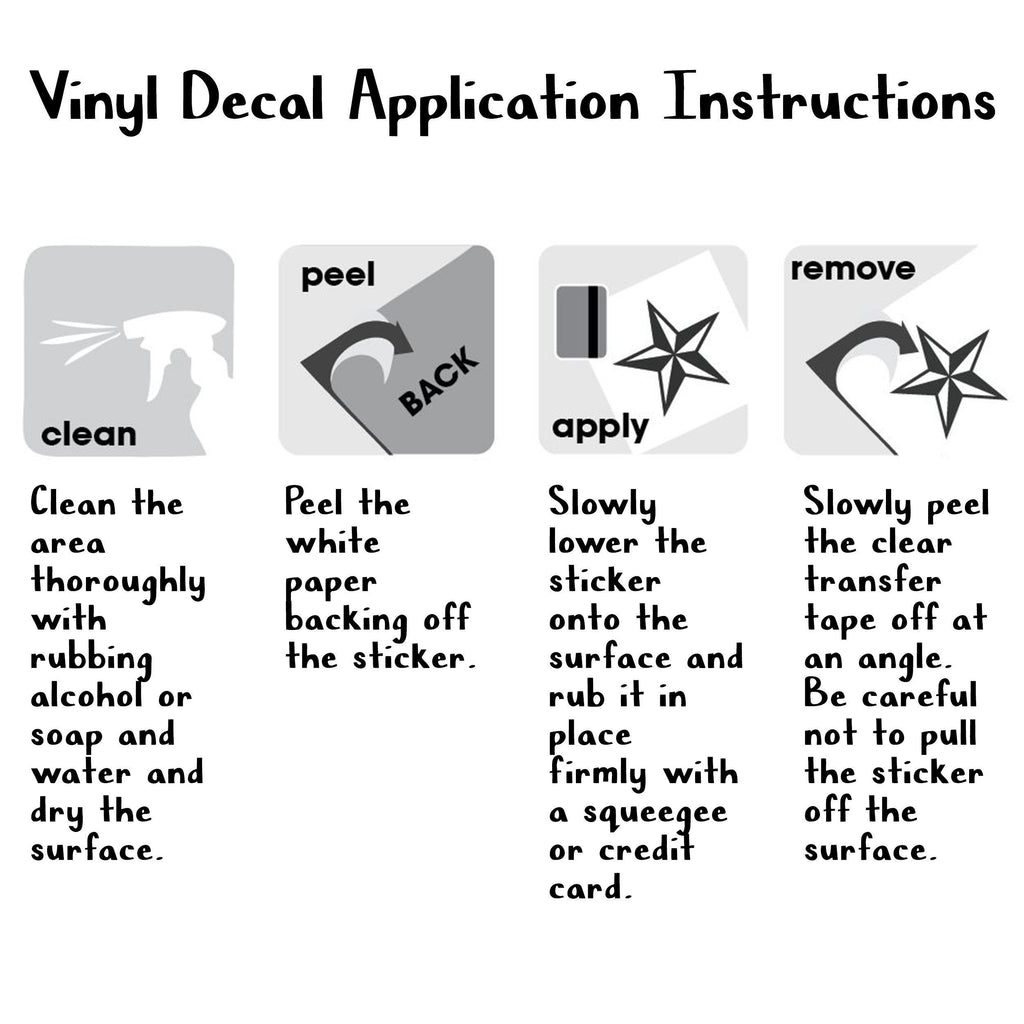
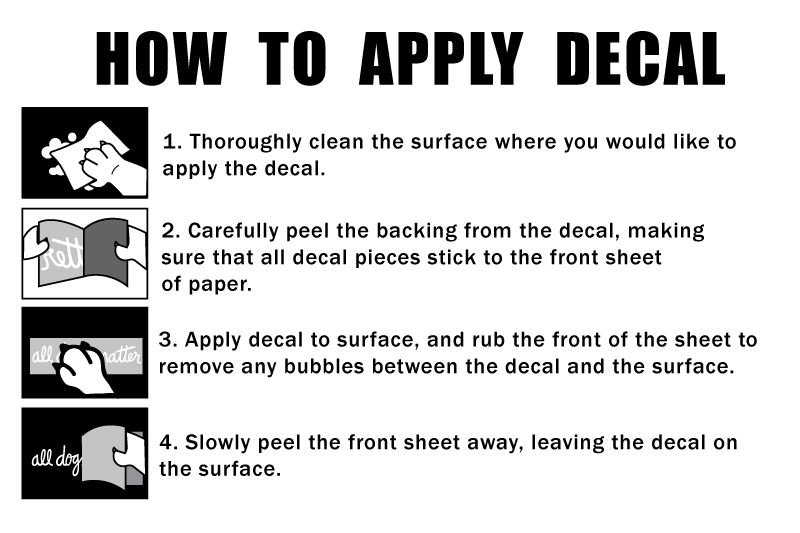 It is crucial to prepare the surface properly to ensure that the decal adheres well. Start by cleaning the surface with soap and water to remove any dirt or debris. Then, wipe it down with rubbing alcohol to eliminate any remaining residue. Let it dry completely before moving on to the next step.
Step 3: Position and Secure the Decal
 Once the surface is prepped, it’s time to position and secure your vinyl decal. Peel off the backing paper from the decal, being careful not to touch the adhesive side. Gently place the decal on the desired spot, making sure it is straight and centered. To keep it in place, use masking tape to secure the top edge of the decal to the surface.
Step 4: Apply the Decal
![Vinyl Decal Application Instructions [Free PDF] - the momma llama](https://i0.wp.com/themommallama.com/wp-content/uploads/2021/03/free-printable-vinyl-decal-instructions-pdf.png?resize=768%2C1086&ssl=1) Now comes the exciting part - applying the decal! Start by using a squeegee or credit card to smooth out the decal from the center to the edges. This will help remove any air bubbles and ensure a smooth application. Work your way across the decal, applying pressure evenly. Take your time and go slow to avoid wrinkles or creases.
Now comes the exciting part - applying the decal! Start by using a squeegee or credit card to smooth out the decal from the center to the edges. This will help remove any air bubbles and ensure a smooth application. Work your way across the decal, applying pressure evenly. Take your time and go slow to avoid wrinkles or creases.
Step 5: Remove the Transfer Tape
 Once the decal is applied, it’s time to remove the transfer tape. Peel back the tape slowly and at a sharp angle. Make sure the decal sticks to the surface and doesn’t come off with the transfer tape. If any part of the decal starts to lift, gently press it down again and continue peeling.
Step 6: Finishing Touches
 Once the transfer tape is removed, take a moment to admire your work! Smooth out any remaining air bubbles or creases with your fingers or with a squeegee. Give the decal a final firm press to ensure it’s securely attached to the surface.
And voila! You have successfully applied your vinyl decal. Now you can enjoy showcasing your unique style and personality with your personalized decal. Remember, practice makes perfect, so don’t be discouraged if your first attempt isn’t flawless. With a little patience and these handy instructions, you’ll become a decal application pro in no time!
We hope you found these instructions helpful. Happy decal applying!